Step-by-step: how to use groups
- Adrian
- Oct 9, 2024
- 5 min read
This step-by-step guide will provide a quick way to use the openUcommunity groups.
Let’s get started!
Firstly, open the Groups page and look around. You can do this by going to https://openucommunity.com/groups. There, you will find a list of existing groups.

You can see more groups by scrolling down and pressing the “show more” button. This will expand the list of available groups.

If you found the groups you’d like to join, click the “Request to Join” button under the group’s name.

You may have noticed that there are different types of groups:
Public - everyone, including people outside the community, can read the content. This type of group is best for general-purpose communication with a low level of sharing sensitive data.
Private - available only for community members. Depending on the settings set by the group creator, joining the group may require manual membership confirmation. Some of the benefits of this type of group include:
Better privacy than public groups
Better control over who can join the group, e.g. members only from your tutor group
Context-specific communication, e.g., a conversation about business strategy doesn’t require an explanation of basic concepts to keep everyone on the same page
Visible for other members in the Groups list. This allows users to request to join the conversation. Good for building bigger communities.
Hidden - those groups cannot be found in the groups list. The only way to become a member is through invitations. This allows for the best control of who joins the group. It is good for selecting only people who may provide additional value without creating negative relations with those who wish to join but do not meet the group creator’s criteria, e.g., a psychology student could not have the same level of business knowledge as a business student.

Overview of the groups page
Once you have joined or created a group, you will see that your group page looks like this:

There are many elements on this page, so let’s go through them now:

Title - on the top of the page. It indicates what group you are currently in
Tab menu - it allows you to switch between different tabs organising information in the group:
Discussion - the feed on the discussion in your group. This is where all the messages live. The messages are organised in descending order (newest first), which allows for easy access to the latest messages
Media - the gallery of photos and videos shared in the group. This allows for easy access to all the shared media rather than scrolling through the feed to find the desired image or video

Files - similar to the media tab, but here, you can find all the files (PDFs, etc) posted to the group. It allows for easy access to the files rather than scrolling through the messages
Members - a list of members of the group. It allows you to see members of the group with the public profile

About - This tab lets you see a description of the group set by the group moderators, the number of members, and activity in the last 30 days. This is a good indicator of whether the group is still active.

Below the tab menu, you will find a box allowing you to create a post. If you click on any of the elements in this box, a new window will pop up, which allows you to write your post.

Below the post-composing box is a feed with all the group messages, organised in descending order (newest first).
On the right side of the window, you will see the About with a short description of the group
Below the About section, you will see the Members box showing the group's members. This is similar to the Members tab in the tab menu.
How to write a post
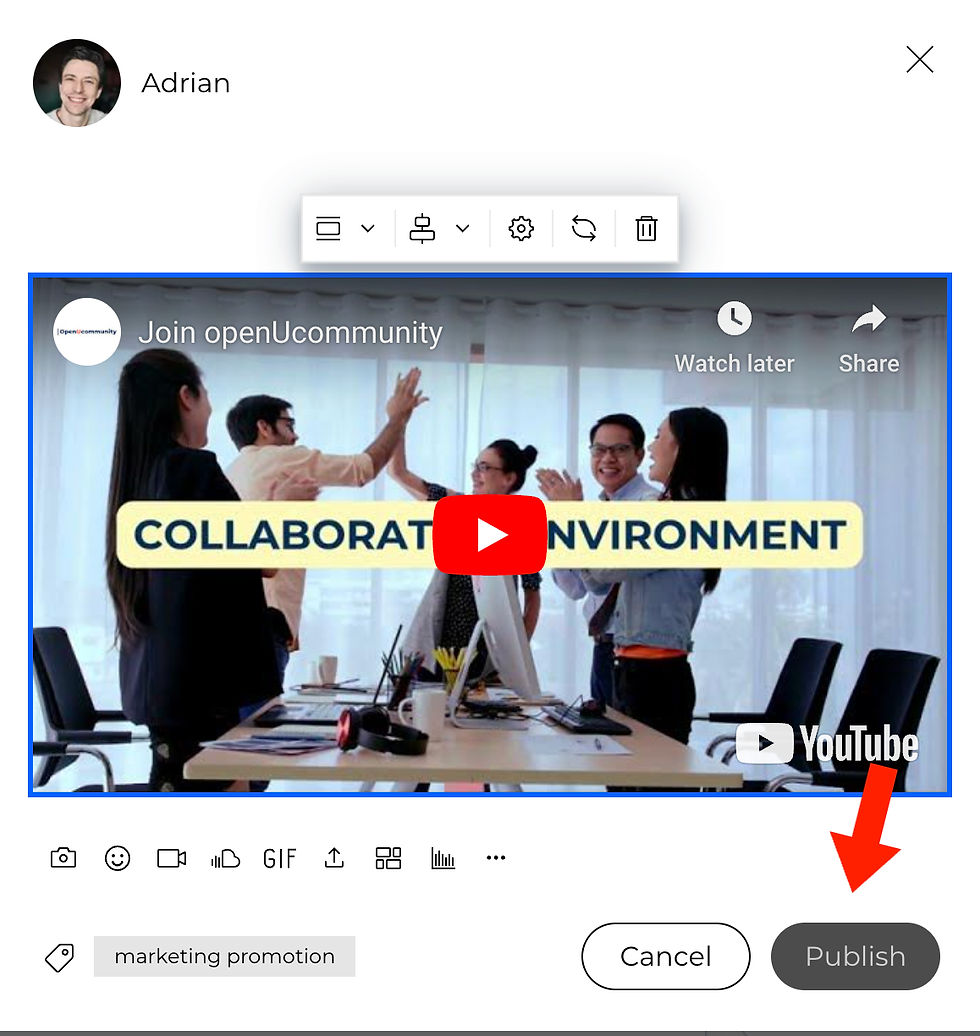
In the Discussion tab, you will see the Compose post box (as discussed above). This opens a new pop-up box that allows you to create your post.

The menu at the bottom of the window allows you to add media to your post. Let’s go through some of the options:

Add image - this option allows you to add images to the post. You have a few options for how you want to display your images.

Size - You can choose the size of the displayed image. There are four available options: small fit, medium, full width, and original size. Each option changes how the post will look, so you can play around and choose the option that best suits your taste.

Align - you can align the image to three different positions: left, centre, and right. It is up to you how your post will look like

Link - this option allows you to add a link to another page. Remember to describe what the user should expect from clicking on the link. Do not click on links that you do not trust.
Settings - this option allows you to select if the image will open in full size and if other users can download the image and write captions and alternative text for accessibility. You can also mark the image as a ‘spoiler’, which shows the notification before the user sees the actual image.

Add emojis - allows you to add emojis to your post. It is good for expressing emotions
Add video - allows to add a link, e.g. from YouTube or upload a small file


Add a SoundCloud track, which allows adding an audio file to the post to enhance the experience. You can either use a YouTube link or upload a small file
GIF - allows to add GIF videos
Add file - allows to upload a file
Add gallery - allows to add a gallery view with multiple images. Good for keeping post clean


Add poll - allows to create a vote that other users can use to express their opinions. You can see more about polls in our forum post tutorial here.
Add an Instagram link - allows you to add a link to an Instagram post
Add X link - allows to add link to X post
Add divider - allows adding a divider to the post. It is a good way to organise different sections of the longer posts
Add button - allows to add a button that would redirect users to a link. Similar functionality to adding a link to an image
In the bottom right corner of the window, there is a plus icon that allows you to add a Topic.

It is a great way to organise and label posts. It can also be handy when you need to find certain posts later.
You can choose from existing topics or create a new topic

If you are happy with your post it is time to Publish. You can do that by clicking the Publish button in the bottom right corner.
Congratulations 🥳 Your post is up, and everyone in the group can see it, react to it, comment and share.
What if you want to find posts with specific keywords in the discussion? Let’s do it now.
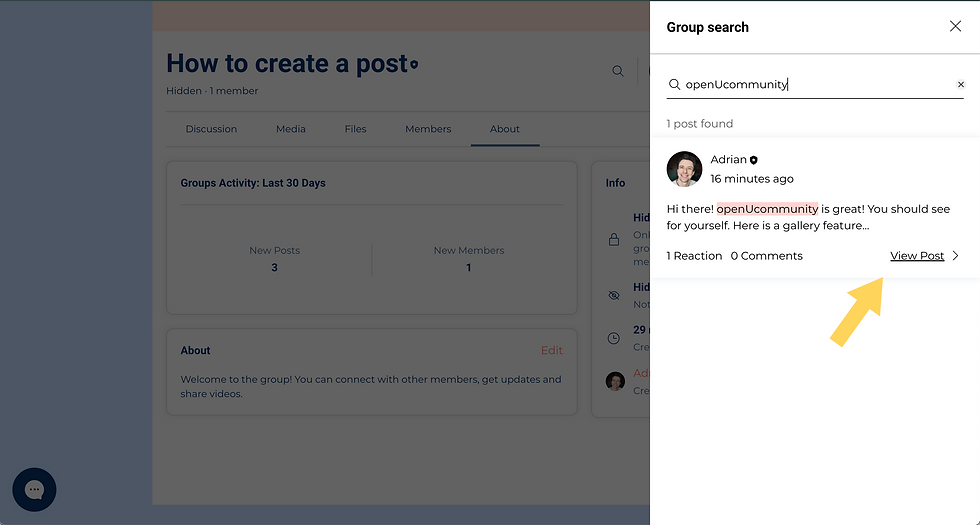
How to search the group
You may want to find specific information in the group. In this case, you may want to use a search tool available under the loop icon on the right side from the group’s name:

After clicking on the loop icon, you will see another window on the right side that allows for searching for text:

All available results will appear here, so you can quickly jump to the post by clicking the View post link at the bottom part of the result:
Now you know how to use groups 🎉 This knowledge will allow you to become more involved and confident while communicating with others online. Many social media platforms use similar ways of interacting with users, so the knowledge you have just learnt can be transferable to other aspects of your life. Now, why don’t you go to our Welcome Group to say Hi 👋 to everyone :)
Check out other tutorials in the openUcommunity category in our blog HERE.
Comentários